Managing OpenTelemetry Collectors, from First Principles
What Problem Does This Solve?
1. The Collector Management Problem
An OpenTelemetry Collector receives, processes, and exports telemetry. Deploying one is straightforward. Managing many is not.
Consider the Astronomy Shop, a microservice demo with a dozen services. You deploy a collector as a DaemonSet. You deploy another as a gateway. A third collects cluster metrics. Each has its own YAML config. Now you need to change the export destination from Jaeger to Dynatrace. You edit three configs, apply them, and hope nothing breaks. Next month you add a new cluster. You do it again.
The problem is not deploying collectors. It is managing their configurations across environments, over time, at scale.
2. BindPlane
BindPlane is a control plane for OpenTelemetry Collectors. Instead of editing configs on each collector, you define them once in BindPlane and it delivers them remotely. One change propagates to every collector that should receive it.
BindPlane is available as a cloud service or self-hosted. This primer uses BindPlane Cloud throughout. The collectors it manages are called agents, but an agent is just an OpenTelemetry Collector. It can be BindPlane’s distribution (which includes the OpAMP management protocol) or the community contrib Collector. Any OTel Collector that speaks OpAMP can be managed by BindPlane.
3. OpAMP
Agents connect to BindPlane using OpAMP (Open Agent Management Protocol), an open standard for managing collector fleets. The agent initiates an outbound WebSocket connection to BindPlane. BindPlane never reaches into your network. The agent calls home. This makes it firewall-friendly: no inbound ports, no VPN tunnels.
For BindPlane Cloud, the endpoint is:
wss://app.bindplane.com/v1/opamp
When the agent connects, it reports its labels, version, and health. BindPlane responds with the configuration the agent should run. If you change the configuration, BindPlane pushes the update over the same connection.
4. What You’ll Need
Before building, you need four things: a BindPlane account, a Kubernetes cluster, a telemetry backend, and the CLI tools to talk to all of them.
BindPlane Cloud
Sign up and generate an API key. You also need the secret key for agent authentication (find it via bindplane secret get).
Kubernetes cluster
Any cluster works. We use GKE Autopilot. You need kubectl configured to reach it.
Telemetry backend
Where your data ultimately lands. We use Dynatrace, but any OTLP-compatible backend works.
CLI tools
bindplane (install), kubectl, helm, and optionally gcloud if using GKE.
Collect your credentials into a .env file. The primer’s repository includes a template:
A source tells a collector where telemetry comes from. It is BindPlane’s abstraction over an OTel receiver. Each source has a type and parameters. You define it once as a named YAML resource, and then any number of configurations can reference it. This is why sources are separate resources: you define an OTLP receiver once and reuse it in both your gateway and node configurations, instead of duplicating the same receiver block in each.
For the Astronomy Shop, we use five source types:
otlp
Receives traces, metrics, and logs via OTLP (gRPC on 4317, HTTP on 4318)
Note: The type names shown above (k8s_container, k8s_kubelet, etc.) do not appear in the BindPlane documentation or UI. The docs and UI use display names like “Kubernetes Container Logs.” To find the actual type names you need for YAML, run bindplane get source-types and match by keyword.
6. Destinations
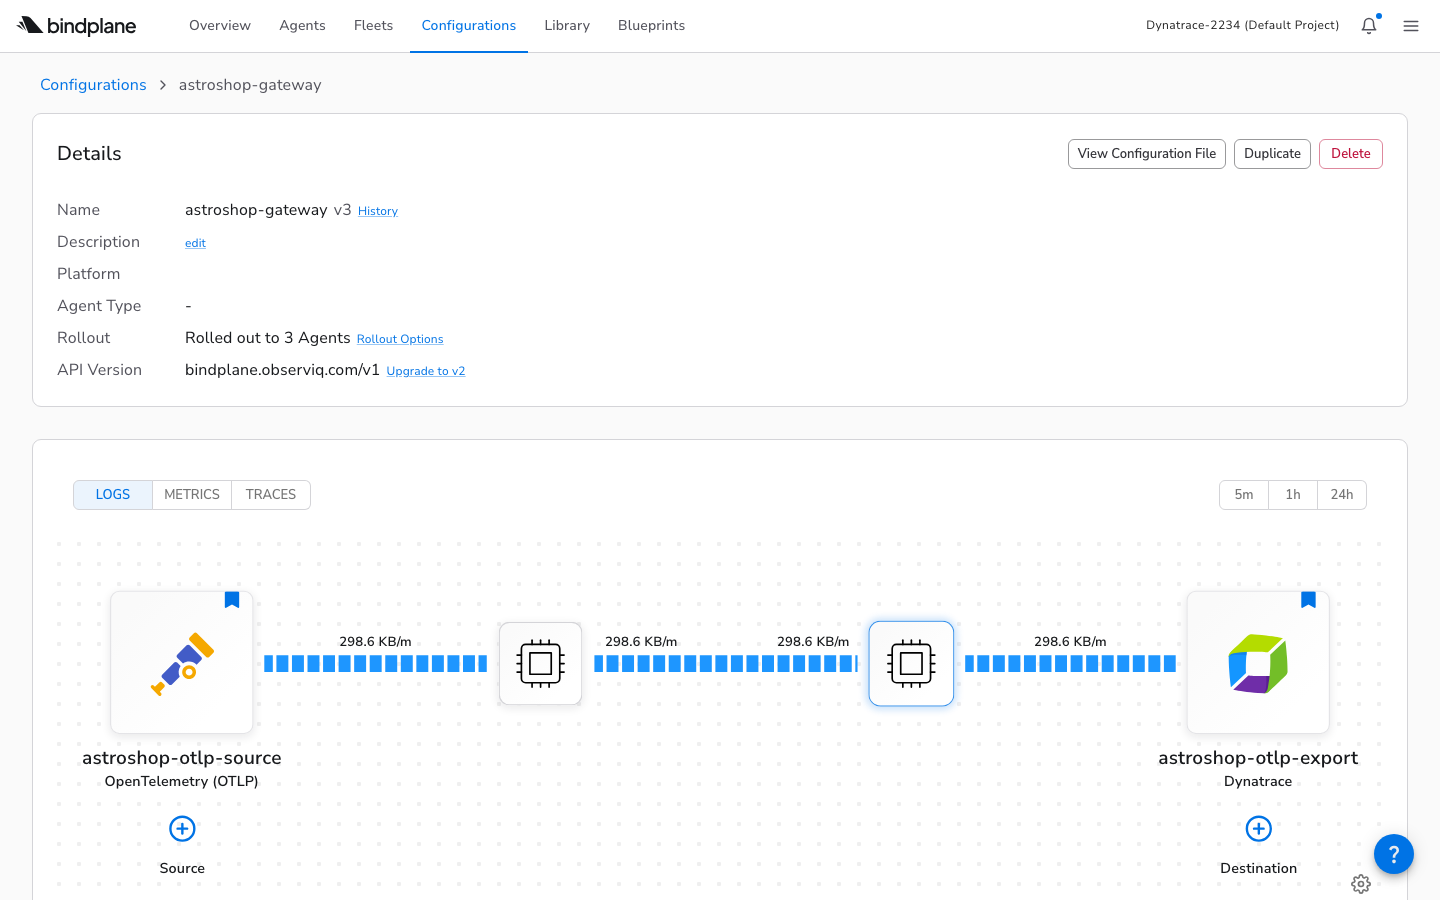
A destination tells a collector where telemetry goes. It is BindPlane’s abstraction over an OTel exporter. Our setup needs two, and understanding why reveals an important architectural decision.
The final backend in bindplane/gateway-destination.yaml -Dynatrace, receiving traces, metrics, and logs:
Why two destinations instead of one? We could have every agent export directly to Dynatrace. But that would mean putting the API token on every node: more secrets to manage, more egress points to monitor, more connections for the backend to handle. Instead, node agents and the cluster agent send telemetry to the astroshop-gateway destination inside the cluster. The gateway agent is the only one that talks to Dynatrace via astroshop-otlp-export. One secret, one egress point, one place to add buffering or filtering later. This is the fan-in pattern.
7. Configurations
Sources and destinations define the inputs and outputs. A configuration wires them together into a pipeline for a specific purpose. It is the unit of deployment in BindPlane: the thing you version, roll out, and roll back. Separating the configuration from the agents that run it is the key idea: you change what a group of collectors does without touching any of them individually. This is bindplane/gateway-config.yaml:
The selector.matchLabels field determines which agents receive this configuration. An agent whose labels include configuration=astroshop-gateway will be matched. Note that this configuration references the source and destination by the names we defined in entries 5 and 6. Those resources must exist before this one can be applied.
Note: The Configuration YAML schema is not documented for CLI use. We discovered through trial and error that platform belongs under metadata.labels, not as a spec field; that measurementInterval only accepts 10s, 1m, 15m, or off; and that sources can be defined inline or by reference. The CLI documentation lists commands but contains no YAML examples.
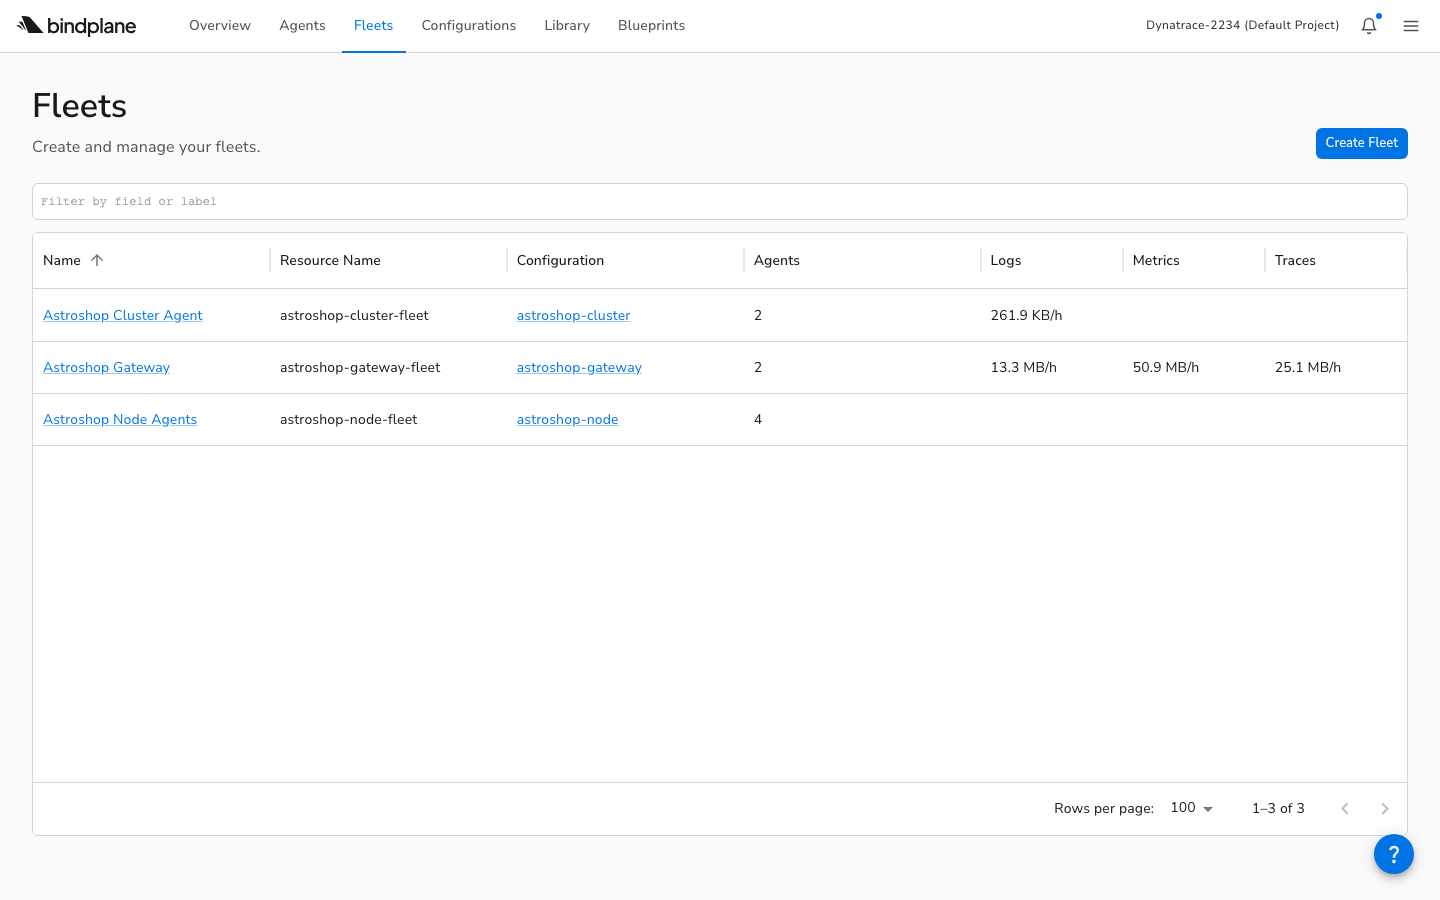
8. Fleets
A fleet groups agents that share a purpose and assigns them a single configuration. All agents in a fleet receive the same config. Where a configuration defines what collectors do, a fleet lets you see how they are doing: how many agents are in the group, their combined throughput, their versions, and their health status at a glance. Our setup has three fleets (gateway, node, cluster), all defined in bindplane/fleets.yaml. Here is the gateway fleet:
The spec.configuration field links the fleet to its configuration, the one from entry 7. The selector.matchLabels determines which agents are automatically added to the fleet. This creates a chain: an agent’s labels match a fleet, the fleet assigns a configuration, and the configuration wires sources to destinations.
The Project
9. The Repository
Everything in this primer is backed by a Git repository. Keeping it in Git is the point -BindPlane resources are declarative YAML, which means you can review changes in pull requests, track history, and deploy from CI. The files fall into three categories: BindPlane resource definitions (what to collect and where to send it), Kubernetes manifests (how to run the collectors), and operational scripts (how to deploy and tear down the whole stack).
The bindplane/ directory contains two kinds of files that look similar but serve different systems. Files like sources.yaml and gateway-config.yaml are BindPlane resources, applied via bindplane apply to the BindPlane control plane. Files like k8s-gateway-agent.yaml are Kubernetes manifests, applied via kubectl apply to the cluster. Understanding which file goes where is essential.
10. The Dependency Chain
These files cannot be applied in any order. BindPlane uses named references: a configuration points to a source by name, a fleet points to a configuration by name. This is intentional: it means you can change a source definition without editing every configuration that uses it. But it also means the resources form a dependency chain. If you apply a configuration before its sources exist, BindPlane rejects it. If you start a rollout before agents connect, there is nothing to roll out to.
The order is: sources and destinations first (they have no dependencies), then configurations (they reference sources and destinations by name), then fleets (they reference configurations), then Kubernetes manifests (the agents that will connect and receive configs), and finally rollouts (which push the configs to the now-connected agents).
This ordering is not enforced by the tool. You simply get errors if you try to apply things out of order. The deploy script in entry 20 codifies the correct sequence.
11. Applying Resources
The bindplaneCLI applies BindPlane resources. Authenticate with your API key, then apply files in dependency order. After each step, verify the resource exists.
At this point, BindPlane knows what to collect and where to send it. But no agents are running yet. Nothing is actually collecting data. The next entries deploy the agents.
The Three Agent Patterns
12. The Gateway Agent
Up to now, everything we’ve applied lives in BindPlane Cloud: definitions of what to collect and where to send it. Now we deploy the actual collectors. Remember, a BindPlane agent is just an OTel Collector. The gateway agent is an OTel Collector running as a Kubernetes Deployment that acts as the central routing point we designed in entry 6. It receives OTLP from other collectors and exports everything to the backend. Because it is the only collector with external credentials, it is also the only one that needs network access outside the cluster. Its manifest is bindplane/k8s-gateway-agent.yaml.
The key environment variables that connect the agent to BindPlane and assign it to the right fleet:
Deploy it with kubectl apply -f bindplane/k8s-gateway-agent.yaml. The agent starts, connects to BindPlane via OpAMP, and waits for its configuration. After you run bindplane rollout start astroshop-gateway, it receives the pipeline and begins collecting.
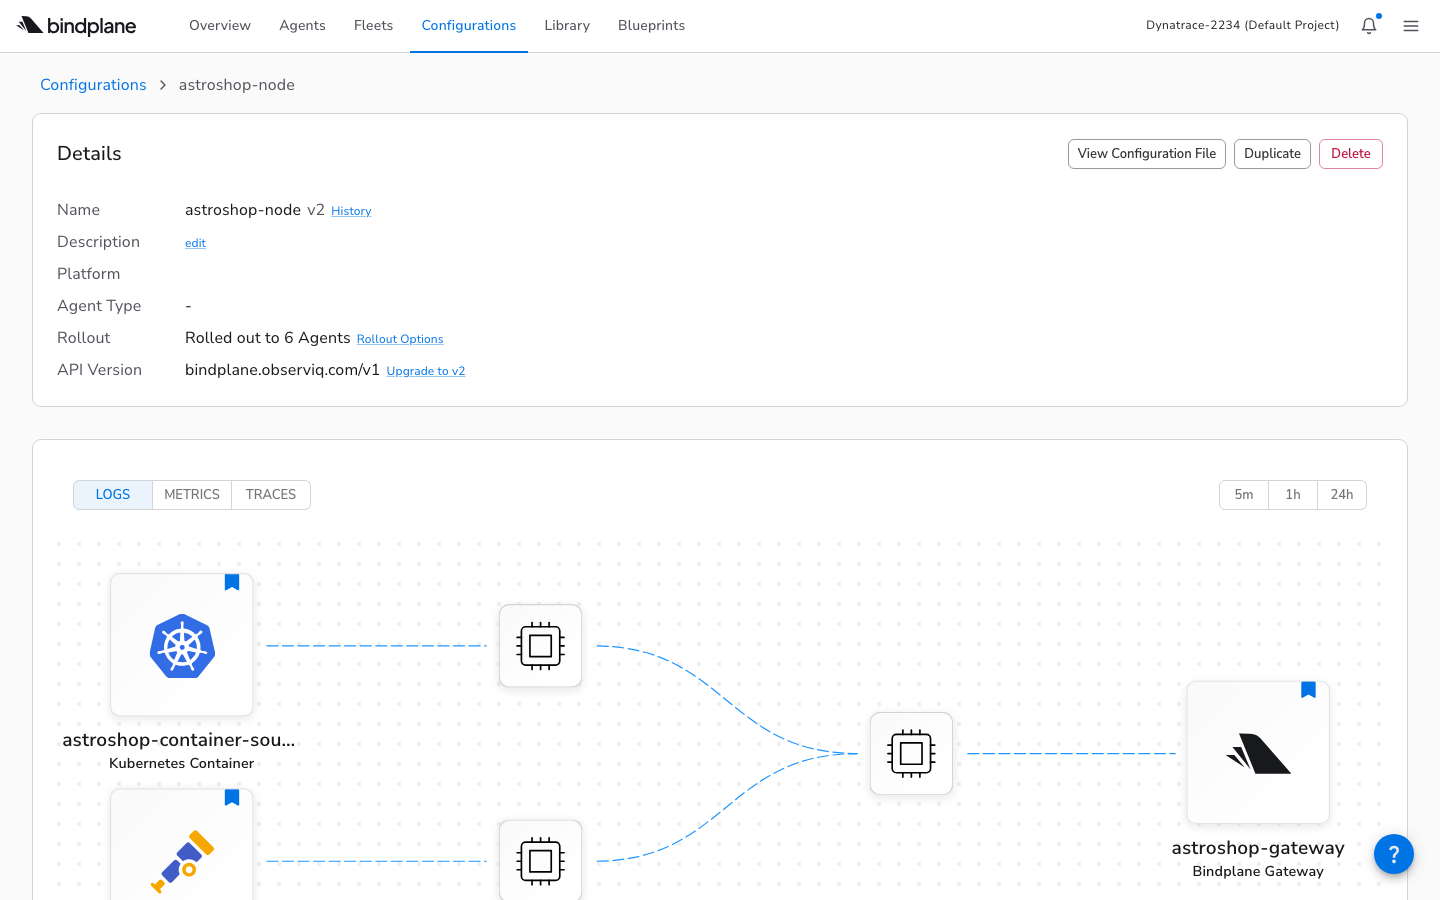
13. The Node Agent
The gateway handles the outbound connection, but it cannot see what is happening on individual nodes. Container logs live on the host filesystem, and pod-level metrics come from the kubelet. The node agent is an OTel Collector running as a DaemonSet so that one instance sits on every node, with access to that node’s logs and metrics. It also accepts OTLP from application pods on the same node, giving them a local endpoint instead of routing across the cluster. Everything it collects flows to the gateway, not directly to the backend. Its manifest is bindplane/k8s-node-agent.yaml.
Key differences from the gateway:
DaemonSet
One per node, not a scalable Deployment
hostPort
Binds 4317/4318 on the host, so pods can send to NODE_IP:4317
/var/log mount
Read-only host volume for container log files
Destination
Forwards to bindplane_gateway, not dynatrace_otlp
Deploy with kubectl apply -f bindplane/k8s-node-agent.yaml, then bindplane rollout start astroshop-node.
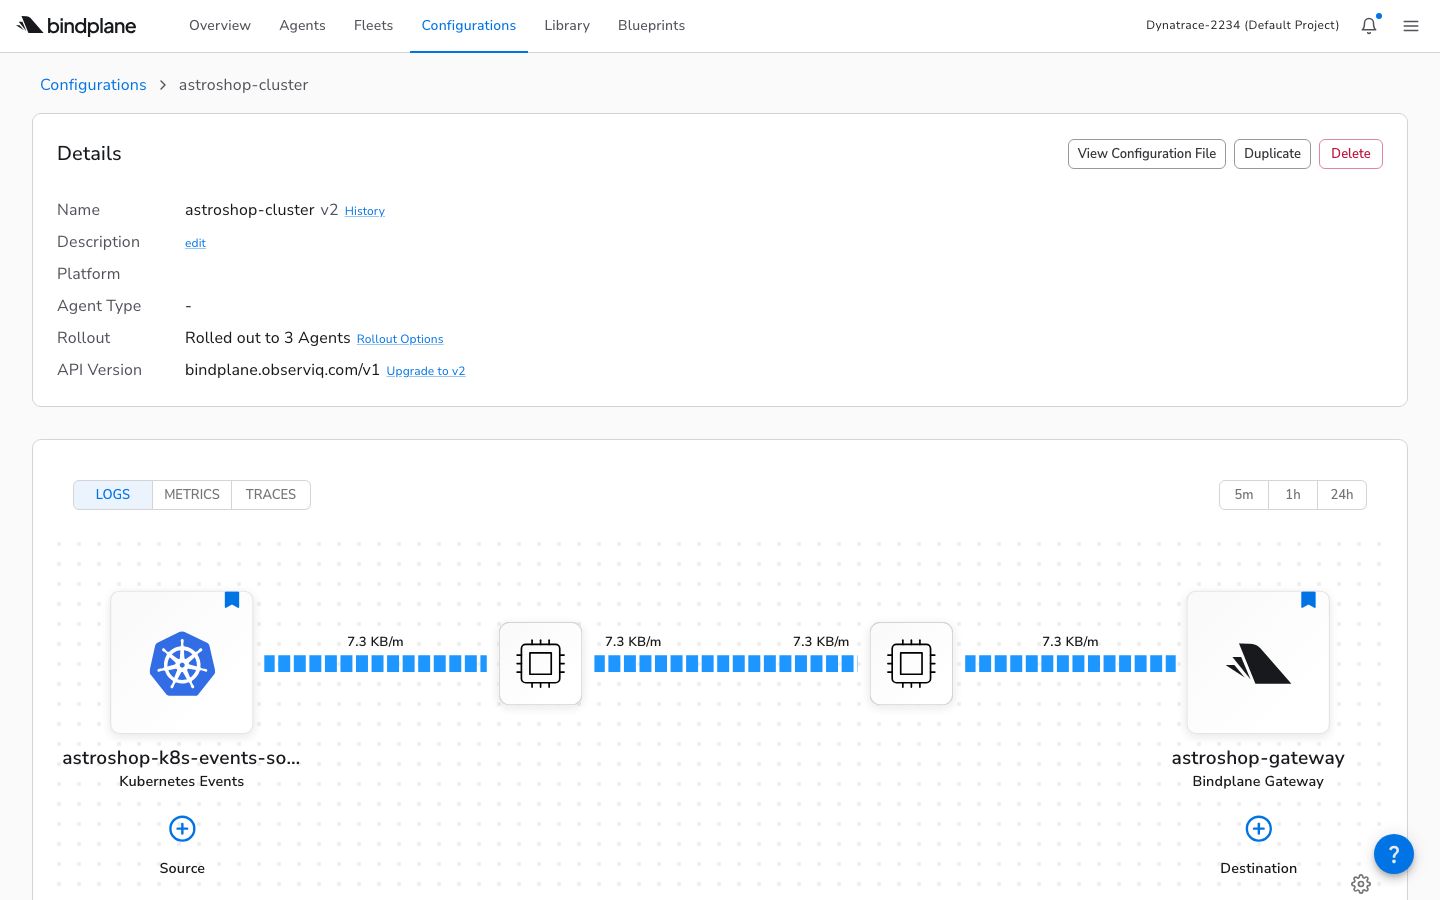
14. The Cluster Agent
Some telemetry is not tied to a specific node. Kubernetes events (pod scheduled, image pulled, OOM killed) and cluster-wide metrics (deployment replica counts, node conditions) are global to the cluster. Running a DaemonSet for this data would be wasteful, since every node would collect the same global events. The cluster agent is an OTel Collector running as a single-replica Deployment that collects this cluster-scoped data and forwards it to the gateway. One pod, one copy, no duplication. Its manifest is bindplane/k8s-cluster-agent.yaml.
Deploy with kubectl apply -f bindplane/k8s-cluster-agent.yaml, then bindplane rollout start astroshop-cluster.
15. The Full Architecture
All three agent types compose into a single architecture. Application telemetry flows through the OTel Collector and gateway to Dynatrace. Infrastructure telemetry (logs, events, metrics) flows through node and cluster agents to the same gateway. BindPlane Cloud manages all agents remotely via OpAMP.
16. Rollouts
The agents from entries 12–14 are now running and connected to BindPlane, but they are not yet collecting anything. They started with a no-op bootstrap config. A rollout pushes the real configuration to them. Why not push immediately on apply? Because pushing a bad config to a hundred agents at once would be catastrophic. Rollouts are phased: BindPlane starts with a small batch, watches for errors, and expands. If an agent rejects the config, the rollout pauses and the agent rolls back to its previous config. You fix the config and try again. No agents are left in a broken state.
$ bindplane rollout start astroshop-gateway
NAME STATUS PHASE COMPLETED ERRORS PENDING
astroshop-gateway:3 Started 1 0 0 1
$ bindplane rollout status astroshop-gateway
NAME STATUS PHASE COMPLETED ERRORS PENDING
astroshop-gateway:3 Stable 1 2 0 0
A status of Stable means every agent accepted the config. Error means at least one agent rejected it. See the rollout documentation for the full lifecycle.
Note: When a rollout fails, bindplane rollout status shows “Error” with a count but not the actual error message. We had to use kubectl logs on the agent pod to find the actual config rejection reason. See entry 22 for the full story.
The Kubernetes Details
17. The Init Container Pattern
You may have noticed the agent manifests include an init container. Here is why. The BindPlane agent is designed to receive its real configuration over OpAMP after it starts. But to start at all, the OTel Collector needs some config file on disk. It refuses to launch without one. And in a hardened container (readOnlyRootFilesystem: true), nothing can be written to the default filesystem. The solution is an init container that writes a minimal bootstrap config into a writable emptyDir volume before the main container starts.
The bootstrap config uses a nop receiver and exporter, a pipeline that does nothing. The agent starts, connects to BindPlane via OpAMP, and immediately receives its real configuration.
Note: The environment variable MANAGER_YAML_PATH is required but completely undocumented. Without it, the agent tries to write manager.yaml to its working directory, which crashes on a read-only filesystem. The fix is MANAGER_YAML_PATH=/etc/otel/storage/manager.yaml, pointing to the writable emptyDir. We found this only through the container crash log.
18. OPAMP_LABELS
How does BindPlane know which configuration to send to which agent? Not by IP, not by hostname, but by labels. When an agent connects, it reports a set of key-value labels. BindPlane matches those labels against the selectors on configurations and fleets. This means a new agent pod can join the right group automatically, with no manual step. The label is baked into the Kubernetes manifest. You set labels in the OPAMP_LABELS environment variable as a comma-separated list.
# In the Kubernetes manifest:
env:
- name: OPAMP_LABELS
value: "configuration=astroshop-gateway,fleet=astroshop-gateway-fleet"
The configuration= label matches the Configuration’s selector.matchLabels from entry 7. The fleet= label matches the Fleet’s selector.matchLabels from entry 8. When the agent starts, BindPlane sees both labels, assigns the agent to the fleet, and pushes the configuration automatically, with no manual step.
Note: Fleet auto-assignment via OPAMP_LABELS is not in the fleet documentation. The docs describe three assignment methods: UI, install-time UI, and bindplane label agent CLI. The pattern of setting fleet=<name> in the Kubernetes manifest for automatic assignment at pod startup is undocumented.
19. The Manifest Gap
There is a deliberate separation of concerns here. BindPlane manages what the collector does: its sources, processors, and destinations. You manage how it runs: the Kubernetes manifest that defines its container image, resource limits, RBAC permissions, volumes, and security context. BindPlane can change the pipeline remotely via OpAMP; infrastructure changes require redeploying the manifest. The k8s-*-agent.yaml files in our repo include:
Note: bindplane install agent supports Linux, macOS, and Windows -but not Kubernetes. The Kubernetes install docs describe a UI-only workflow where you copy generated YAML from the web interface. There is no CLI command to generate manifests. We hand-crafted all manifests using patterns from an observIQ GitHub example. The complete manifests are in our repository.
Operating the System
20. The Full Deploy Sequence
The entries above introduced each piece individually. This entry shows how they all come together in sequence. The ordering follows the dependency chain from entry 10: resources that are referenced must exist before the resources that reference them. If you have cloned the repository, filled in .env, and have a cluster ready, you can run this end to end.
#!/usr/bin/env bash
# 1. Connect to your cluster
gcloud container clusters get-credentials $GKE_CLUSTER \
--region $GKE_REGION --project $GCP_PROJECT
# 2. Apply BindPlane resources in dependency order (entry 10)
bindplane apply -f bindplane/sources.yaml # entry 5
bindplane apply -f bindplane/gateway-destination.yaml # entry 6
bindplane apply -f bindplane/gateway-to-bindplane-destination.yaml
bindplane apply -f bindplane/gateway-config.yaml # entry 7
bindplane apply -f bindplane/node-config.yaml
bindplane apply -f bindplane/cluster-config.yaml
bindplane apply -f bindplane/fleets.yaml # entry 8
# 3. Create the Kubernetes namespace and agent secret
kubectl create namespace bindplane-agent
kubectl -n bindplane-agent create secret generic bindplane-agent-secret \
--from-literal=secret-key="$BINDPLANE_SECRET_KEY"
# 4. Deploy agents — they connect via OpAMP (entry 3)
kubectl apply -f bindplane/k8s-gateway-agent.yaml # entry 12
kubectl apply -f bindplane/k8s-node-agent.yaml # entry 13
kubectl apply -f bindplane/k8s-cluster-agent.yaml # entry 14
# 5. Deploy the application (entry 21)
helm repo add open-telemetry https://open-telemetry.github.io/opentelemetry-helm-charts
helm upgrade --install astroshop open-telemetry/opentelemetry-demo \
-f astroshop-values.yaml --namespace astroshop --create-namespace
# 6. Push configurations to connected agents (entry 16)
bindplane rollout start astroshop-gateway
bindplane rollout start astroshop-node
bindplane rollout start astroshop-cluster
# 7. Verify
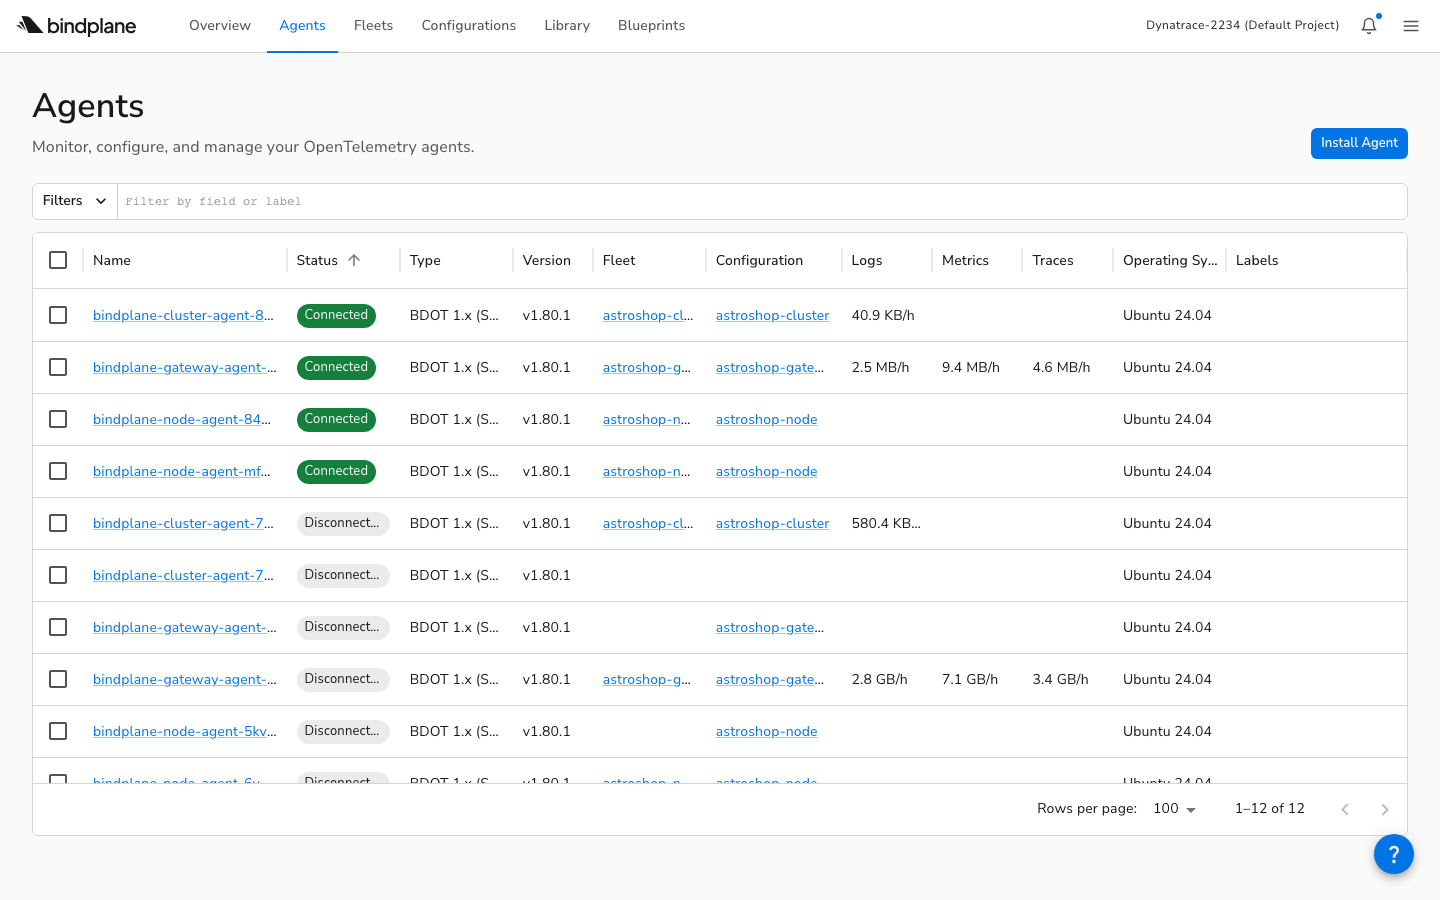
bindplane get agents # should show Connected agents
kubectl get pods -n bindplane-agent # should show Running pods
kubectl get pods -n astroshop # should show the demo app
This is the same sequence used in scripts/deploy.sh and .github/workflows/deploy.yml. The workflow adds GCP authentication, Helm installation, and BindPlane CLI setup as preceding steps. See the workflow file for the complete CI/CD version.
21. The Astroshop Collector
The Astronomy Shop ships with its own OTel Collector that sends telemetry to Jaeger, Prometheus, and OpenSearch. Since any OTel Collector can be a BindPlane agent, you could replace this collector with a BindPlane-managed one and control its entire pipeline remotely. For this primer, we take a lighter approach: keep the existing collector and add a second exporter in astroshop-values.yaml that forwards a copy of everything to the BindPlane gateway.
The otlp/bindplane exporter uses Kubernetes service DNS to reach the gateway in the bindplane-agent namespace. Both the original exporters and the BindPlane exporter receive a copy of every signal. The application’s built-in observability continues to work alongside BindPlane.
22. Debugging a Failed Rollout
After rolling out the node configuration, we saw this:
$ bindplane rollout status astroshop-node
NAME STATUS PHASE COMPLETED ERRORS PENDING WAITING
astroshop-node:1 Error 1 0 1 0 2
One agent errored. The remaining two were held back. But what was the error? The CLI showed only the count. The docs say to click the red error text in the UI. From the terminal, we had to go to the pod logs:
$ kubectl logs -n bindplane-agent bindplane-node-agent-wblpl --tail=5
{"level":"error","caller":"observiq_client.go:398",
"msg":"Failed applying remote config",
"error":"failed to reload config: collector failed to restart:
'metrics' has invalid keys: k8s.pod.volume.usage"}
The BindPlane-generated collector config included a metric (k8s.pod.volume.usage) that agent v1.80.1 did not support. The agent rolled back gracefully to its previous config. The rollback worked perfectly. The problem was the gap between “something went wrong” and finding out what.
The fix was straightforward: remove the k8s_kubelet source from the node configuration (its metrics were incompatible with this agent version), re-apply, and re-roll out. The second rollout went to Stable with zero errors.
What We Learned
23. Takeaways
BindPlane sits between your OTel Collectors and the problem of managing them at scale. The core loop is: define sources and destinations as YAML, wire them into configurations, group agents into fleets, and push changes via rollouts. The agents handle the rest over OpAMP.
The parts that make this practical:
GitOps
Every resource is a YAML file in a repo. bindplane apply is the only command you need. CI/CD follows naturally.
Safe rollouts
Phased delivery with automatic rollback. You can push a config change to a hundred agents and know that a bad config won’t stick.
Fleet grouping
Configurations flow through fleets to agents. Add a new node to the cluster and its agent joins the right fleet automatically via labels.
No server to run
BindPlane Cloud’s OpAMP endpoint is a single WebSocket URL. Agents connect out. No ingress, no VPN, no infrastructure to maintain.
The complete setup, including all YAML files, Kubernetes manifests, deploy scripts, and the GitHub Actions workflow, is in the repository. Fork it to start your own deployment.